Tim Holtz Craft Scissors
Tonic / Tim Holtz Scissors
This Blog Post provides a complete run down on the various types of Tim Holtz Scissors that are available as well as how to care for and sharpen them. If you haven't used this brand before then I hope this Blog Post will encourage you to go out and give one of them a test run. You won't be disappointed!
Use in Craft Activities
These Scissors are the go-to cutting implement for many a crafter. High-quality, versatile, duo-tipped features that make these excellent for cutting on all types of materials including paper, card, fabrics, materials, plastics, foam, acetate packaging, foil, sheet rubber, and grunge board.
There are various different types of scissors you can choose from. My favorite pair are the Mini Snips as they are perfect for detailed and fussy cutting.
Who is Tim Holtz?
Most of you have probably heard of Tim Holtz, however in case you haven't here is a little bit of information.
Tim is an exceptionally creative innovator of some fantastic craft products. Tim has a love for eclectic vintage which has inspired a career in designing for various companies including Ranger, Tonic, and others. Read more on the Ranger Holtz website.
Types of Tim Holtz Scissors
Tim is well renowned for his designing a wide range of various craft tools. Including guillotines, dies and of course scissors.
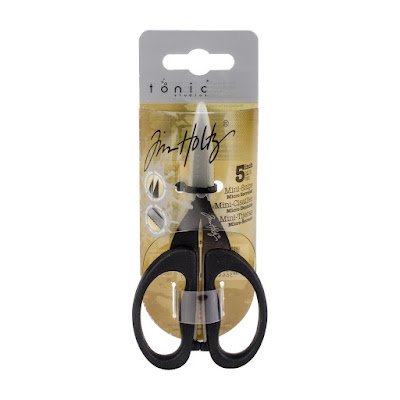
Right and Left Handed Non-Stick Titanium Micro Serrated Scissors - Mini Snips, 5 inch
The 5 inch Mini Snips are my overall favourite go to for fussy cutting. These scissors have fine point sharp tip blade points and are non-stick, with a micro-serrated blade. They come in both right-handed and left-handed varieties. Which is super cool as I am a lefty myself.
They are excellent for cutting on all types of materials including paper, card, fabrics, materials, plastics, foam, acetate packaging, foil, sheet rubber and grunge board.
Being small (similar size to embroidery scissors), they're great for use in the sewing room as well for snipping threads, fine wire, sewing cotton, yarn, and embroidery thread. Use in your craft room, office, school, studio for general use, crafts, scrapbooking, and any other art and craft projects.
The soft cushion "Kushgrip" handles give a comfortable grip for hours of use and less fatigue. Non-stick coating means no build up of adhesive or other mediums but when something does attach itself, it wipes off easily. The blades are very sharp and come with a sheath (plastic cap) for blade protection for safe handling.
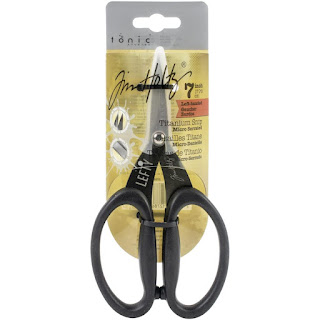
Right and Left Handed Non-Stick Micro Serrated Tim Holtz Scissors, 7 inch
The 7 " Non-Stick Micro Serrated Scissors are perfect for scrapbooking and paper projects. Resistant to rust and corrosion Non-stick coating minimizes adhesive build up .
Extra large Kushgrip Handles for comfort and less fatigue with a micro serrated edge great for detail cutting. They are excellent cutting on all types of materials, such as sheet rubber, vinyl and adhesive-backed papers
Haberdashery Scissors, 6 inch
Made by Tonic Studio with titanium coated, precision ground, ultra sharp blades, these strong, durable scissors are built to last. With its resistance to rust and corrosion, they are perfect for any of your projects whether in the sewing room, craft room or art studio.
They will cuts all kinds of fabrics and materials easily. and feature a black, soft cushioned "Kushgrip" handles to give a comfortable grip for hours of use and less fatigue. The blades are smooth and very sharp with a very defined point to enable you to trim into tight corners and curves. They also come in a handy storage
Explanation of Terminology
Not sure about some of the terminology. When it comes to these scissors, there may be some terms you're not all that familiar with. Here's a bit of a rundown.
Non-stick Coating?
The non- stick coating minimises adhesive build-up. The coating acts as a resistance to an adhesive which is good for us crafters that like using them for cutting our double-sided and 3-dimensional tape.
Micro Serrated?
Micro serrated scissors are a type of scissors that have very small, sharp teeth on the blade. This makes them ideal for cutting through tough or thick materials, as the teeth can grip and cut through the material more easily than a regular pair of scissors. They are also great for making precise cuts, as the teeth help to keep the blade in place and prevent it from slipping.
Titanium?
Titanium is molecularly stronger than steel so scissor blades can be sharpened to a much sharper edge than steel because even a thinner kerf blade can hold its shape better than steel. So not only are titanium scissors stronger than steel, they can be sharper.
Caring for your Scissors
One of the most annoying things that can happen to a crafter is having blunt scissors. Apply these tips and keep your scissors sharp and in tip top condition.
Use them only for their intended task
Resist the temptation to reach for the nearest pair of scissors to cut cardstock or fabric. You'll dull or nick the metal and may also throw off the alignment of the blades. Keep a separate pair for each material such as paper, fabric or metal.
Avoid moisture
Scissors are from metal so they don't like moisture. As crafter's, we often get caught up in the crafty moment. However, it pays to be mindful to keep our scissors away while we are spraying or spritzing. Moisture or water can cause rust and discoloration. Ultimately affecting our scissor's life expectancy.
Keeping them clean
Wipe them regularly including the blade and the pivot screw (where lint and grease build up) with a soft, dry cloth. If you get glue residue on the blades wipe them with a moist cloth and then dry the blades thoroughly.
Keeping them sharp
Scissors are a bit like punches. They do require sharpening. Here are a few methods, you may not have tried yet.
Sharpening Your Scissors With Sandpaper
A sandpaper sheet with 150-200 grit will work just great. Have the rough edges face outward, so the sandpaper grazes against both blades as you cut the paper. Cut through the sandpaper, cutting long strips, about 10-20 times. You will notice that the blades become sharper with every strip of sandpaper cut. Employ full scissor strokes, beginning the cutting at the base of the scissors and extending to the tip. Cutting through sandpaper is good for scissors that aren’t horribly dull, but just need some touch-up sharpening. The sandpaper also helps smooth out nicks and indents on the blades.
Sharpening Your Scissors With Aluminum Foil
Take a piece of aluminum foil, about 8-10 inches long, and fold it lengthwise multiple times so you have a thick, folded strip of foil. Cut strips of the aluminum foil with your scissors until you have cut the entirety of the thick aluminum strip. Again apply full scissor strokes, cutting beginning at the base of the scissors and extending to the tip. Depending on the width of the strips you cut, you can sharpen your scissors' blades a lot (by cutting many, skinny strips) or just a little bit (by cutting a few, thicker strips).
Sharpening Your Scissors With a Glass Mason Jar
Did you know that you can actually sharpen scissors with a Mason Jar. I wasn't sure whether I was game enough to try this! But gave it a go anyway!
Step 1. Fit the scissor blades around the mason jar. Open the pair of scissors as wide as they can go, and position the blades around the sides of the mason jar. The jar should be as far as it can go between the two blades.
Step 2. Hold the jar with one hand, and the scissors with the other hand. Cut the mason jar. Squeeze the scissors closed, and slide the mason jar out from between the blades as the scissors close. This is the same way you would close the scissors if you were cutting paper or fabric.
Step 3. Apply light pressure to close the scissors, and let the glass do the sharpening work for you. glass is made of sand and although it's melted it can still use as a sharpener. Repeat this process until the blades have a smooth, clean edge. Be mindful that the Mason Jar may get damaged a little because the blades of the scissors might leave scratch marks on the jar.
After cleaning wipe down the blades using a damp paper towel to clean off any bits that may have collected on the blades while sharpening the scissors.
Make the investment
All metal scissors can be a costly investment, but a quality pair will cut better, last longer, and can be sharpened over and over again. Scissors with plastic handles will never last as long as those made of quality metal. So it pays to spend a little more and know that these scissors will be your craft buddy and will last you a very long time.
View Full Product Details including Customer Reviews
If you would like to see the product on the webpage with some additional information, extra images as well as customer reviews. Visit the Tim Holtz Products Collection Page.


No comments